Kiwi RTV mechanic
New member
Hi everyone,
Having been a follower of this forum for a long time I wanted to share my experience for the benefit of anyone else having similar issues.
I should start by saying I have some mechanical experience, but my experience with Kubota's is limited to this repair on my RTV. I am likely to have made all sorts of mistakes in my faultfinding and repair process, and it is possible that some of you will be horrified at some of what I am about to detail.
I bought my RTV-X1120D as an insurance write off a couple of years ago. It was in pretty good condition cosmetically, however it had been written off due to a transmission issue. I was able to contact the local agent who had diagnosed the transmission and confirmed that they had made a braze repair to the leaking charge pipe and then carried out the pressure tests as described in the work shop manual troubleshooting. The transmission had failed and the vehicle written off.
Through dumb luck, I was able to put everything back together (new filters and non-oem oil) and get the machine to run. It ran quite well, with the only issue being that if didnt have much torque when moving off from a standing start. By that I mean I needed a low speed run-up to clear the lip into my shed. In-spite of this the machine was able to climb hills, tow a trailer and carry a good 400kg in the bed without any real issue. I could have lived in this state for years, and I did for at least 18 months (of weekend use only) however one day when driving slowly into a paddcok the machine gradually came to a gentle shuddering halt. In high it would shudder but not really move, with the same in reverse. Initially in low it would drive, but eventually this too stopped working. Placed on axle stands the machine would hesitate to turn its wheels, but once spinning it would run to full speed. In this state it produced almost no torque at all, and the wheels could be prevented from turning by hand.
I eventually procured a hydraulic test set, but in all honesty I found it extremely difficult to get any sort of reliable reading regardless of following the service manual. This was true once the rebuild was complete, so I am not sure if the issue was me, the guages, the maachine or a combination of each.
Having been unable to establish the cause, and having tried the cheapest options of filter and (this time) OEM S-UDT oil I pulled the transmission.
Below are some pictures of the damage I found.


Unfortunately I didn't do a great job of photographing the strip process, but you get the idea from these of what was wrong.
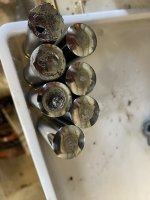
The pistons are from the motor side of the HST and as you can see at least one of them was so badly damaged that there was actually a hole in the end of the bearing face. Oddly not all of the pistons were damaged, and the block had absolutely no damage at all. Just a point of note here, if I had removed the cover plate from the side of the servo regulator (Servo piston cover (6 bolts), which is a low point on the HST, I would have found a handful of metal chunks telling me the pistons where damaged.
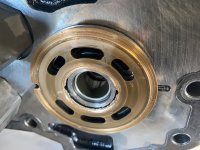
The pump port block cover was badly damaged, however this was I think as a result of my previous efforts in installing the charge pump without first heating the bearing which caused the shoulder of the drive shaft to bounce off the port block.

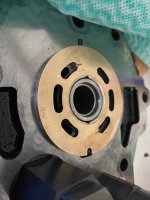
#7 below the bearing face was badly scored from the damaged pistons but I managed to dress the damage out with wet and dry.
The HST case had alot of swarf and pieces of piston throughout although interestingly none of these had made it to the pressure or suction filters which I cut open to inspect.
Fast forward a couple of weeks to the rebuild.
I managed to find a local breakers who had a pump block and pistons which saved me alot of money on the cost of a new item.
The replacement piston wear faces weren't perfect so I spent a few hours with scotchbrite and autosol metal polish dressing them. For interests sake I re-used my original block with a mixture of the best of the replacement and original pistons. I know the manual says not to mix and match but the fit was identical.
I flattened off the two valve plates with wet and dry to remove pretty much all wear.

I used a die grinder to dress the HST case to provide clearance between the swashplate and the case, and I also dressed the edges of the swashplate bearing surfaces as they had been damaged by the swarf from the failed pistons causing the swashplate to bind slightly on the case if it was not perfectly centred on its cradle bearings.
Re-assembly is fairly straightforward, however the comment you see through this forum that the shop manual can be tough to follow is true in my experience. One good example is the requirement to install a M10 bolt into the port block cover before removing the shaft #3 above on dissassembly (following removal of a plug which is not shown in the manual). This bolt sets the end float of the motor shaft and without it you wont be able to fit the snap ring which holds the shaft in place.
Re-installation of the HST is fairly easy... but what came next is really what I wanted to write this whole saga for becuase it may help someone who is contemplating replacement of a perfectly good HST.
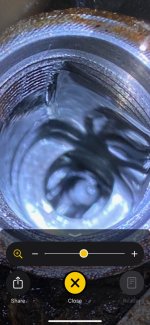
With oil levels topped off I took the machine for a gentle run in the paddock. All good until after about 10 minutes it started to slow down and lost power. I assumed it was the oil level, however there was plenty on the dipstick, no leaks etc. It actually felt as though the brakes were holding the machine and not releasing when I tried to drive. I tested the hydraulic pressures again, but as before the readings where all over the place, with the exeption of the pump pressure (not charge pressure). It is also worth mentioning that the HST began making a high pitch scream under throttle which was horrific. I tried every test in the shop manual to find what was going on and eventually I noticed that if I had the machine on stands, and with the servo regulator disconnected if I moved the control linkage in the opposite direction to normal I could get the machine to drive (albeit in reverse and still screaming). Appreciating that this is not that helpful in of itself, it gave me assurance that the internals were still in one piece. With that peace of mind I went about removing and inspecting (for a second time) the charge releif valve, the unload valve, and the check and high pressure relief valve. Eventually I found what I think is the issue. The poppet of the check valve had cocked off in the port. I know this because I was able to photgraph it on my phone (I think that is what is shown here anyway).

Difficult to explain how this happened, as the vehicle was working 'fine' when I first installed the rebuilt HST. It may be possible that air in the system caused this, as the HST took some time to settle down when first re-installed and I took this to be the hydraulics self-bleeding.
In any case, with the poppet re-installed correctly all was well. The HST took a few miles to work out all the air bubbles, but I am please to say it is running flawlessly and has been for months. Full torque now available, but oddly not that much of a performance gain given the amount of damage previously.
These Kubota's are nicely built (but highly complex machines), and wheras they could concievably run for months with horrific mechanical damage as mine certainly did, something as minor as a displaced poppet valve can stop them dead.
Given the costs invovled with replacing an HST, I thoroughly recommend making the effort to tear your HST down and replacing only those parts which are damaged.
This post is in no way a brag. I consider my experience to be one of extreme luck and my intention in posting is purely to payback those of you have have posted valuable guidance previously.
If anyone has any questions or corrections, please feel free to comment or reach out.
My sincere thanks to this community for providing me with the confidence to set out on this repair.
Best of luck with your own repairs.
Having been a follower of this forum for a long time I wanted to share my experience for the benefit of anyone else having similar issues.
I should start by saying I have some mechanical experience, but my experience with Kubota's is limited to this repair on my RTV. I am likely to have made all sorts of mistakes in my faultfinding and repair process, and it is possible that some of you will be horrified at some of what I am about to detail.
I bought my RTV-X1120D as an insurance write off a couple of years ago. It was in pretty good condition cosmetically, however it had been written off due to a transmission issue. I was able to contact the local agent who had diagnosed the transmission and confirmed that they had made a braze repair to the leaking charge pipe and then carried out the pressure tests as described in the work shop manual troubleshooting. The transmission had failed and the vehicle written off.
Through dumb luck, I was able to put everything back together (new filters and non-oem oil) and get the machine to run. It ran quite well, with the only issue being that if didnt have much torque when moving off from a standing start. By that I mean I needed a low speed run-up to clear the lip into my shed. In-spite of this the machine was able to climb hills, tow a trailer and carry a good 400kg in the bed without any real issue. I could have lived in this state for years, and I did for at least 18 months (of weekend use only) however one day when driving slowly into a paddcok the machine gradually came to a gentle shuddering halt. In high it would shudder but not really move, with the same in reverse. Initially in low it would drive, but eventually this too stopped working. Placed on axle stands the machine would hesitate to turn its wheels, but once spinning it would run to full speed. In this state it produced almost no torque at all, and the wheels could be prevented from turning by hand.
I eventually procured a hydraulic test set, but in all honesty I found it extremely difficult to get any sort of reliable reading regardless of following the service manual. This was true once the rebuild was complete, so I am not sure if the issue was me, the guages, the maachine or a combination of each.
Having been unable to establish the cause, and having tried the cheapest options of filter and (this time) OEM S-UDT oil I pulled the transmission.
Below are some pictures of the damage I found.


Unfortunately I didn't do a great job of photographing the strip process, but you get the idea from these of what was wrong.
The pistons are from the motor side of the HST and as you can see at least one of them was so badly damaged that there was actually a hole in the end of the bearing face. Oddly not all of the pistons were damaged, and the block had absolutely no damage at all. Just a point of note here, if I had removed the cover plate from the side of the servo regulator (Servo piston cover (6 bolts), which is a low point on the HST, I would have found a handful of metal chunks telling me the pistons where damaged.
The pump port block cover was badly damaged, however this was I think as a result of my previous efforts in installing the charge pump without first heating the bearing which caused the shoulder of the drive shaft to bounce off the port block.

#7 below the bearing face was badly scored from the damaged pistons but I managed to dress the damage out with wet and dry.

The HST case had alot of swarf and pieces of piston throughout although interestingly none of these had made it to the pressure or suction filters which I cut open to inspect.
Fast forward a couple of weeks to the rebuild.
I managed to find a local breakers who had a pump block and pistons which saved me alot of money on the cost of a new item.
The replacement piston wear faces weren't perfect so I spent a few hours with scotchbrite and autosol metal polish dressing them. For interests sake I re-used my original block with a mixture of the best of the replacement and original pistons. I know the manual says not to mix and match but the fit was identical.
I flattened off the two valve plates with wet and dry to remove pretty much all wear.

I used a die grinder to dress the HST case to provide clearance between the swashplate and the case, and I also dressed the edges of the swashplate bearing surfaces as they had been damaged by the swarf from the failed pistons causing the swashplate to bind slightly on the case if it was not perfectly centred on its cradle bearings.
Re-assembly is fairly straightforward, however the comment you see through this forum that the shop manual can be tough to follow is true in my experience. One good example is the requirement to install a M10 bolt into the port block cover before removing the shaft #3 above on dissassembly (following removal of a plug which is not shown in the manual). This bolt sets the end float of the motor shaft and without it you wont be able to fit the snap ring which holds the shaft in place.
Re-installation of the HST is fairly easy... but what came next is really what I wanted to write this whole saga for becuase it may help someone who is contemplating replacement of a perfectly good HST.
With oil levels topped off I took the machine for a gentle run in the paddock. All good until after about 10 minutes it started to slow down and lost power. I assumed it was the oil level, however there was plenty on the dipstick, no leaks etc. It actually felt as though the brakes were holding the machine and not releasing when I tried to drive. I tested the hydraulic pressures again, but as before the readings where all over the place, with the exeption of the pump pressure (not charge pressure). It is also worth mentioning that the HST began making a high pitch scream under throttle which was horrific. I tried every test in the shop manual to find what was going on and eventually I noticed that if I had the machine on stands, and with the servo regulator disconnected if I moved the control linkage in the opposite direction to normal I could get the machine to drive (albeit in reverse and still screaming). Appreciating that this is not that helpful in of itself, it gave me assurance that the internals were still in one piece. With that peace of mind I went about removing and inspecting (for a second time) the charge releif valve, the unload valve, and the check and high pressure relief valve. Eventually I found what I think is the issue. The poppet of the check valve had cocked off in the port. I know this because I was able to photgraph it on my phone (I think that is what is shown here anyway).

Difficult to explain how this happened, as the vehicle was working 'fine' when I first installed the rebuilt HST. It may be possible that air in the system caused this, as the HST took some time to settle down when first re-installed and I took this to be the hydraulics self-bleeding.
In any case, with the poppet re-installed correctly all was well. The HST took a few miles to work out all the air bubbles, but I am please to say it is running flawlessly and has been for months. Full torque now available, but oddly not that much of a performance gain given the amount of damage previously.
These Kubota's are nicely built (but highly complex machines), and wheras they could concievably run for months with horrific mechanical damage as mine certainly did, something as minor as a displaced poppet valve can stop them dead.
Given the costs invovled with replacing an HST, I thoroughly recommend making the effort to tear your HST down and replacing only those parts which are damaged.
This post is in no way a brag. I consider my experience to be one of extreme luck and my intention in posting is purely to payback those of you have have posted valuable guidance previously.
If anyone has any questions or corrections, please feel free to comment or reach out.
My sincere thanks to this community for providing me with the confidence to set out on this repair.
Best of luck with your own repairs.

 Very impressive thread. Thank You for sharing your experience with this rebuild. So awesome!!!!!!