You are using an out of date browser. It may not display this or other websites correctly.
You should upgrade or use an alternative browser.
You should upgrade or use an alternative browser.
RTV 900 Head Gasket
- Thread starter texczech
- Start date
If you need the tightening sequence pm me your snail mail address and I snail mail a copy of my pages.( No working scanner). Bordercollie
LETHAL GTS
Member
Tightening torque Cylinder head screw
37.3 to 42.1 N·m
3.8 to 4.3 kgf·m
27.5 to 31.1 lbf·ft
Cylinder Head
1. Loosen the pipe clamp (2), and remove the water return pipe (1).
2. Disconnect the spring (3) from the speed control lever.
3. Remove the cylinder head screws in order of to (a).
4. Lift up the cylinder head to detach.
5. Remove the cylinder head gasket and O-ring (4).
(When reassembling)
• Replace the cylinder head gasket with a new one.
• Securely fit the O-ring (4) to the pipe pin.
• Tighten the cylinder head screws after applying sufficient oil.
• Tighten the cylinder head screws in order of (a) to .
.
• Tighten them uniformly, or the head may deform in the long run.
• Retighten the cylinder head screws after running the engine for
30 minutes.
37.3 to 42.1 N·m
3.8 to 4.3 kgf·m
27.5 to 31.1 lbf·ft
Cylinder Head
1. Loosen the pipe clamp (2), and remove the water return pipe (1).
2. Disconnect the spring (3) from the speed control lever.
3. Remove the cylinder head screws in order of
4. Lift up the cylinder head to detach.
5. Remove the cylinder head gasket and O-ring (4).
(When reassembling)
• Replace the cylinder head gasket with a new one.
• Securely fit the O-ring (4) to the pipe pin.
• Tighten the cylinder head screws after applying sufficient oil.
• Tighten the cylinder head screws in order of (a) to
• Tighten them uniformly, or the head may deform in the long run.
• Retighten the cylinder head screws after running the engine for
30 minutes.
Your RTV might not have the o-ring mentioned above. Mine didn't, but it's a later model.
If you need to remove the glow plugs, spray some penetrating oil into the threads and let 'em soak a few minutes before unscrewing them. Then clean the plug threads and put some high temp anti-seize on them before you put them back in. They seem to corrode easily.
There's a water outlet on the front end of the head. If you take it off, make sure you put it back on BEFORE you re-install the head. Otherwise you'll be pulling the head off again. The outlet can't be removed or installed while the head is still on the block.
When you remove the injector pipes from the pump, loosen the two outside compression nuts (#3 and #1) first and slide them up and out of the way. That way the middle (#2) nut will be much easier to get to.
SpudHauler
Active member
1pump
That is the greatest info. Nothing like putting things back together once.
And you will not find your instructions in any manual.
That is the greatest info. Nothing like putting things back together once.
And you will not find your instructions in any manual.
I'm putting a tag on this thread and the other one the head gasket . That way when folks do a search it will be easier to find." RTV head gasket" Bordercollie
Couple of other things-
The two RTV's I have are later models with the 4 bolt valve cover. The cover has a rubber gasket that (so far) seems to be re-usable. It'll probably stay in the cover when you pull it off. Just leave it in there. That way you'll save a few bucks, or if you bought an upper-end gasket kit you can save the gasket that came with it for a later time, like when you need to adjust the valves or re-torque the head bolts. I've had mine off several times each, and no leaks yet.
And speaking of valves, you should adjust them after you put the head back on. It doesn't take long to do- if you do it right, you only have to turn the engine over once. I don't remember the exact sequence off the top of my bald head, but if you need the info I have it in my manual at work. You're gonna need the torque spec for the rocker shaft bolts as well. It's a lot easier to access the head bolts without the rockers in the way. And don't forget to keep the pushrods in order since they're wear-matched.
And there's also lash caps on the top of each valve. They just sit there, and they'll fall off if you manhandle the head too much. They can drop into the engine or somewhere else where you can't find 'em. Better to take them off and keep them in order before pulling the head off.
Kubota says to just keep cranking it until the engine starts in order bleed the air out of the injector pump and lines. That's fine if you're only changing the fuel filters, but trust me, you'll be there all freakin' day if the injectors and pump are dry. I cracked the compression nuts on the injectors about a turn loose, then cranked it until I saw a little fuel leaking out of the top of each injector. I tightened up the nuts, cranked it, and she fired right up.
I'm not trying to sound like a know-it-all, I'd just like to save somebody some time, money, and aggravation. I got nailed by a seized (then broken) glow plug and the water outlet thing in my other post, and it cost a chuck of time and money. The Kubota dealers don't stock any parts that aren't popular, so a bad move can cost you days of waiting or a lot of coin for overnight freight.
LETHAL GTS
Member
Couple of other things-
Kubota says to just keep cranking it until the engine starts in order bleed the air out of the injector pump and lines. That's fine if you're only changing the fuel filters, but trust me, you'll be there all freakin' day if the injectors and pump are dry. I cracked the compression nuts on the injectors about a turn loose, then cranked it until I saw a little fuel leaking out of the top of each injector. I tightened up the nuts, cranked it, and she fired right up.
.
Also great advise to those who have run their diesel engine out of fuel. Do Not over tighten them though or it will get very expensive. Also too much cranking is hard on your starter. So I do not agree with Kubota's theory on this.
wheezer
Goofy Member
Hey all you helpful folks. I, too, am replacing my head gasket. I have the service manual and figured I would follow it step by step and all would be well. However, as you might expect, I struck a snag. I removed all the appurtenances, then removed all the head bolts in the order stated in the service manual. Now, all the bolts are out but I can't pull the head up as it is supposed to do. I even pryed on it a little with a pry bar, but, of course, being careful with concern of breaking something. Is there some secret to getting it loose from the block?
Don't necessarily do what I say because I have never done this. But if it were me, I would go around the edges with a sharp utility knife inward ( wear eye protection) and then alternate a putty knife (thin) all around till I gradually worked my way between the 2 pieces.(being careful not to scratch or gouge) It probably has the gasket stuck. have a good evening wheezer. bordercollie
wheezer
Goofy Member
Another question regarding my "stuck head". Is it necessary to remove the glow plugs and injection nozzle holders BEFORE removing the head? That's probably a really stupid question but I just assumed that they are threaded only into the head itself and could be removed with the head. The service manual has you taking them out before the head bolts. I know what they say about "assume", so I probably should remove them before proceeding further? Or is it okay to just keep working toward breaking the head loose and leave the glow plugs and nozzle holders in the head?

wheezer
Goofy Member
In answer to my question above, no, the glow plugs and fuel injection nozzles do not have to be removed before removal of the head. The head will come out just fine with these still in it. I know this because I was able to get the head off with only a very little bit of trouble today. I was just in too big a hurry yesterday. I'm just saying for future reference... : )
wheezer
Goofy Member
Now that I see that no one except me and bordercollie are reading this thread anyway, I can admit to the real truth about my so-called "stuck" cylinder head. The next time I went out to see my RTV with the head almost off, the reason I had been unable to lift the head off was obvious -- there were still 3 bolts in it! Duh!  I had loosened all the bolts in the order specified in the service manual but for some goofy reason, in unscrewing them all by hand the rest of the way, I just plain didn't get all of them out of the head. Good thing I didn't pry on it but a very little.
Now, I feel better. As they say, bordercollie, confession is good for the soul.
 I had loosened all the bolts in the order specified in the service manual but for some goofy reason, in unscrewing them all by hand the rest of the way, I just plain didn't get all of them out of the head. Good thing I didn't pry on it but a very little.
 Now, I feel better. As they say, bordercollie, confession is good for the soul.

Ummm, this thread has over 2200 views. I assure you, we're all reading it.Now that I see that no one except me and bordercollie are reading this thread anyway, I can admit to the real truth about my so-called "stuck" cylinder head.
I am glad it worked out wheezer! I can tell you that we have all done such things. Did you ever see my confession of the transmission drain plug? I was preoccupied when changing it,forgot the plug, and saw the liquid gold running by my foot.... rolled under and stuck my finger in the hole till I could grab the plug.... talking about the greazy look for a few days  collie
wheezer
Goofy Member
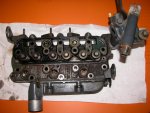
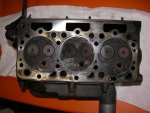
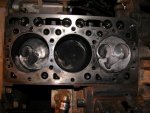
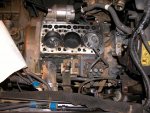
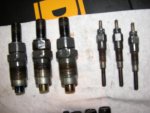
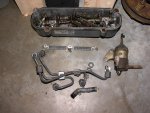
In continuing documentation of the head gasket replacement, I thought some photos of my disassembled head might be useful to someone in the future. So, here they are attached. Now, here is another goofy wheezer question for y'all -- how clean is clean enough for the head to go back in place? Should I scrape, rub, sand, polish or what? I believe I have taken off all I can already in the photos you see unless I use some solvent or something on the mating surfaces. Let's here some opining on extent of cleanliness that is necessary.
Attachments
muleman RIP
Gone But Not Forgotten
What I have done in the past for heads is to slide a large flat file the length of the head. Not really filing but it will drag on any raised areas that you missed. Just nice to know you have it clean and flat and did not miss any pieces of gasket.
When you get it all back together you want to check your fan switch for proper operation as most head problems come from overheating. Bodercollie has a thread on here about replacing hers.
When you get it all back together you want to check your fan switch for proper operation as most head problems come from overheating. Bodercollie has a thread on here about replacing hers.

