Reasonable Price for Bed Rail Standards ?

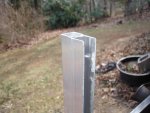
I saw those too. If I were to do them without a welder, I'd just purchase the boards from the lumber yard and the square stock that fits in the bed holes and bolt them together. It will be much less then $99 for the total job. If you want the boards flush with the bed sides, buy the square stock and u-channel and bolt them together, then slide in the wood. Again, under $99 total. Square stock is available from any Big Box or Farm Store. Here in my little corner of the world, I use Alro Steel, most areas have a steel supplier locally with lower price generally than the big box's.

JMHO, Bob
 
I agree with avanti, you could do a better job and cheaper as long as you have access to a drill.
 
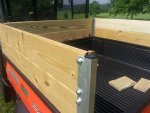
I used the square tube and channel, but I put them together with pop rivets, holding up well.
 

Attachments

  • 2013-05-20 11.12.22 (Medium).jpg
    2013-05-20 11.12.22 (Medium).jpg
    81.9 KB · Views: 277
  • 2013-05-20 11.12.10 (Medium).jpg
    2013-05-20 11.12.10 (Medium).jpg
    98.8 KB · Views: 276
If your interest is carbon steel or stainless steel welded versions, I HIGHLY recommend getting with Peanut on this forum. Peanut's fabrication is excellent and he stands behind and in front of his products. Seems as though he has made a set an RTV, and if so, probably has templates.
 
Thanks guys, I bet Peanut could do a bang up job on a set of these. I saw his fenders and am looking for something that I can make work and I'll mount them to the frame like on the 1100. Got double knee replacement coming up, so might be a while before I get to that. That will give me time to keep up on my reading here and come up with some more ideas.
 
Milkman
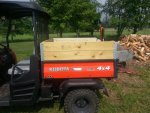
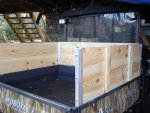
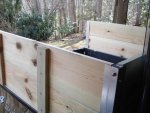
Nice work and pictures. Yours also place the boards flush with the front of the box plus they look taller. Bob
 
Nice job on the rails milkman. Also good luck with the knee replacements. You must a been a dairyman.. collie
 
Nice job on the rails milkman. Also good luck with the knee replacements. You must a been a dairyman.. collie


Thanks, just got word today that the replacements might be put on hold as they want to try a scope again, will know for sure Friday one way or the other. Not a dairyman, just used to do a run to Toronto and back twice a week that had several stops each way so dispatch just called it the milk run.
 
Milkman
Nice work and pictures. Yours also place the boards flush with the front of the box plus they look taller. Bob

Thank you, I can rick the back with split green wood and round it up, that thing don't even know it's loaded, hook a trailer on the back and it still hauls down the road.
 
Thanks for everyone's input and ideas.
I've decided to buy some 1" aluminum square tubing and make my own, for a total cost of $35, less the boards. I have not been able to find aluminum channel so I going to mount a 10" abrasive metal cutting blade to my table saw and rip off one side of the square tubing to make the channel pieces. I'll use pan head machine screws and nuts to attach the pieces together similar to Milkman, but I want to be able to install and remove quickly and just slide my boards in without bolting them. I will post pictures when I complete.
 
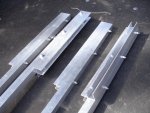
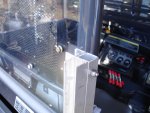
Again, thanks for the good ideas. Here are pictures and description of the side board standards that I built yesterday similar to Milkman's:

I bought 2-8 ft. pcs. of 1"aluminum square tubing, 1 1/2"(1/4" dia.) S/S machine screws, S/S nylon lock nuts, 1 1/4" S/S wood screws, and 3- 1x8-12' pressure treated pine boards, all from Home Depot (my favorite place to shop). Total material cost: $94.50

Cut 1 stick of tubing into 4 equal lengths (just shy of 24" to allow for cutoff blade thickness. Cut 6-14" pcs off the other stick of tubing. (Note: could not find 1" channel aluminum) I mounted a 10" abrasive metal cutting blade in my table saw. I carefully ripped out the inside end of each 14" pc. (I had to raise the blade about 5/8" to make it cut better and not generate as much heat, wear gloves). It galled the aluminum a little so I used a 4" angle grinder to smooth it out and round the sharp edges.

I drilled 3 - 1/4" holes to attached each pc. together, 6 holes on the 2 corner standards. Inserted the machine screws from the inside of the channel and installed nylon lock nuts to the outside. The screw end barely stuck out beyond the lock washer and doesn't create a cutting hazard.

I cut the 1x8's 1/2" short of the inside dimension of the channel which allows enough clearance from the screw heads and allows for easy installation. I didn't not attach the boards to the standards because I wanted to be able to remove them quickly, but did screw some small pcs to each side to keep the boards attached to each other.

The aluminum standards should be strong enough for my application, but I can always use at ratchet strap if I need more strength. I'm going to place a pc. of bicycle tubing under the edge of each standard to prevent scratching of the paint until I don't care anymore.

I hope this is helpful.
 

Attachments

  • 2014-03-14 KUBOTA BED SIDES 3.15.14 005.jpg
    2014-03-14 KUBOTA BED SIDES 3.15.14 005.jpg
    73.2 KB · Views: 222
  • 2014-03-14 KUBOTA BED SIDES 3.15.14 002.jpg
    2014-03-14 KUBOTA BED SIDES 3.15.14 002.jpg
    63.4 KB · Views: 222
  • 2014-03-14 KUBOTA BED SIDES 3.15.14 003.jpg
    2014-03-14 KUBOTA BED SIDES 3.15.14 003.jpg
    52.5 KB · Views: 221
  • 2014-03-14 KUBOTA BED SIDES 3.15.14 006.jpg
    2014-03-14 KUBOTA BED SIDES 3.15.14 006.jpg
    76.9 KB · Views: 219
  • 2014-03-14 KUBOTA BED SIDES 3.15.14 008.jpg
    2014-03-14 KUBOTA BED SIDES 3.15.14 008.jpg
    79 KB · Views: 219
Came in to eat lunch and had to take a look :) Fantastic pictures Tribute. Thank you for posting and the great descriptions. You and Milkman certainly have talent. collie
 
Tribute:
Nice job you did on your RTV sideboards. I really appreciate that you took the time to list all your materials and posted pictures as well. It gives some of us other DIY'rs ideas as to what is possible in the home workshop.
 
Top